Step 1: Enable Virtual Results
While not a prerequisite to set up a Virtual Challenge, it's strongly recommended that you check out our Go Virtual race hub for information on basic setup, planning, promotion, and more to make your virtual challenge a success. The setup guide will give examples of setting up a summer running challenge to complete 200 miles during the summer.
Enabling Virtual Results for Challenges
From the Race Dashboard, use the Menu Search for virtual and choose Configure Virtual Results or navigate to RaceDay Tools >> Virtual/Challenge Results >> Configure Virtual Results.
Virtual Event Check
If you see the following message, that means you haven't set up the Event Type as a virtual event so you will need to return to the Race Wizard to make this change. Otherwise skip to the next section titled Getting Started.

Either click the link in the message or navigate back to the Race Wizard by going to Race >> Race Wizard and choose "Virtual Race / Challenge" in the Event drop-down menu as shown below.
Getting Started
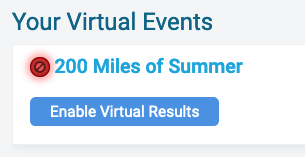
If you see the following message then you are ready to get started by clicking the blue Enable Virtual Results button.
This will bring you to a full-screen view where you will set up the basics of your virtual challenge event.
Important things to know about setting up an Enhanced Virtual Race:
No Bibs, no results. Participants will not be able to submit results, unless they have bib numbers. Any type of bib assignment will work, but we recommend automatic bib assignment during registration.
Bibs before messages. Bib numbers must be assigned before the first message is distributed, or results will not work.
No Text messages. Text submissions of challenge results are not supported, only single time submission events are supported (i.e. Virtual 5K).
Results Settings
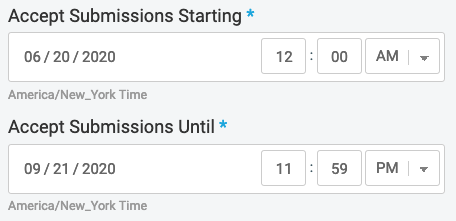
Accept Submissions Starting - This is when your challenge begins and you want participants to start recording their activities. For the example race since the summer of 2020 begins on 6/20/2020, that is the date that was entered.
Accept Submissions Until - This is when your challenge ends and all activities need to be submitted by to count towards results. The end of the summer of 2020 is 9/21/2020, that is the date that was entered.
Result Set - Choose Create New Result Set from the drop-down menu and then name the results. The default is the name of the event so for this example we left the default name. For advanced challenge settings that involve Alternate Event options, click here for more info.

Can Participant Submit Multiple Activities? - For Challenges this should be set to Yes. This will allow participants to log their activity on a daily basis to accumulate their efforts to complete the challenge. With this set to No, you're not doing a challenge and instead a single race (such as a Virtual 5K).
For Each Activity, What can the Participant Upload? - Times are optional, but for challenges Distance Complete (or Other Tallies) must be checked. There is even an option for Elevation. When checked, select the Tally Type and Label for "Tally" Field for further customization. You can even allow participant to log their elevation! For the example challenge, times and distance in miles are allowed.

Accept Activity Dates - Enter in the starting and ending dates where participant activities can be counted towards results. Since this is a summer challenge the start date is the first day of summer. Usually this will match the result submission period as well, but if you want to allow participants to count activities prior to the start of the challenge a date range can be specified here.
How Should the Results Be Sorted? - For the results leaderboard for challenges, it's typical to sort by Greatest Distance/Tally with Time Tie-Breaker. Or if you are doing an Elevation challenge, Greatest Elevation Gain with Time Tie-Breaker can be selected. For the example challenge, it's set to sort on Greatest Distance/Tally with Time Tie-Breaker.

Minimum Allowed Time - If times are enabled, this is the minimum allowed time per recorded activity, not the entire challenge. This was just set to 1 minute.
Maximum Allowed Time - If times are enabled, this is the maximum allowed time per recorded activity, not the entire challenge. This was set to 6 hours in the example.
There are additional check boxes that are completely optional. For best participant support, it's strongly recommended to allow the option for participants to submit their results quicker by entering their E-mail or last 4 digits of their phone number instead of logging in. It can also be inclusive to all participants to not require a time but just the distance or tally.

Be sure to save the settings by clicking the blue Save button at the bottom or at the top-right of the screen.
This will bring you back to the Virtual/Challenge Results page to continue customizing the options. You can hover over the status light to see if there are any issues. Yellow typically means the results are scheduled in the future where green would mean submission is available now.

Continue to set up Activity Types.